Thursday, September 20, 2012

Mussels with Herb & Garlic Butter

Mussels with Herb & Garlic Butter on a salad
Mussels with Herb & Garlic Butter
I have to admit, I'm not much for mussels. It's just the thought of eating the squishy things. With a father allergic to seafood, or so I was raised thinking, I didn't grow up eating any seafood. It's kind of ironic that I was born on the little island of Cuba, surrounded by water...and surrounded by seafood; yet, seafood was taboo in our home. Now, having a personal chef business, there is no room for limited thinking in my endless mind chatter. It's up to me to continue my growth as an adult and as a personal chef. It's up to me to expand my taste pallet in the realm of seafood. In this manner, I am better able to serve my clients. Some foods will take longer than others for me to delve into. Slowly but surely, I continue to awaken the taste buds with food that is healthy and, in most instances, very quick to prepare. (Most seafood takes very little time to cook.) As such, I decided to start expanding my seafood journey with mussels. If some of you already have experience with mussels, and perhaps love them, this recipe will not disappoint. If you are an individual that has never tried mussels, for reasons other than being allergic to it, give this recipe a try. I found myself pleasantly surprise by this dish! My husband and I ate the whole thing! And we really enjoyed it!

This dish can be served as a Tapa or appetizer, along with fresh salad greens, complimenting other seafood, yellow rice, or even pasta. It's up to you. It's very versatile. 

Ingredients (serves 8)

  • 1 lb 12 oz/800 grams fresh mussels, in their shells
  • splash of dry white wine, such as a sauvignon blanc or whatever you have on hand
  • 1 bay leaf
  • 3 oz/85 grams of butter
  • 12 oz/350grams (generous) or 1/2 cup fresh white or brown bread crumbs
  • 4 Tbsp chopped fresh flat-leaf parsley, plus extra sprigs to garnish
  • 2 Tbsp snipped fresh chives
  • 2 garlic cloves, finely chopped
  • salt and pepper
  • lemon wedges, to serve

Method
1.  Preparing the mussels is the first step. If you've never done this before, its not as intimidating as it may appear. I place the mussels in a bowl of cold water, that has been mixed with a handful of flour, for 30 minutes. This causes the mussels to  drink the water and purge out their sand. After the 30 minutes, scrub the mussel shell under cold running water and pull of any beards. Discard any shells that are cracked or broken.

2. (Prepare the topping) Melt the butter and pour into a small bowl. Add the bred crumbs, parsley, chives, garlic, and salt and pepper to taste and mix well together. Allow the mixture to rest until the butter has set slightly.

3. Place the mussels in a large pan (that has a tight fitting lid) and add the wine and the bay leaf. Cook, covered, over high heat for 5 minutes. Shake the pan a little occasionally or until the mussels open. Drain the pan and discard any mussels that are closed. (Those mussels were dead to begin with, so don't eat them.) At this point, it should appear similar to the photo below.
cooked mussels
Next, shell the mussels by removing half the shell. Keep the half in which the mussel is in its shell and arrange in a large, shallow, ovenproof serving dish.


4. Using your fingers or a spoon, take a large pinch of the herb butter mixture and fill each mussel shell, pressing down firmly. It should appear something like the photo below.
Mussels topped with Herb butter mixture and ready for oven

5. To serve, bake the mussels in a preheated oven, 450 degrees F / 230 degrees C, for 10 minutes, or until hot. Serve immediately, garnished with parsley sprigs, and accompanied by lemon wedges for squeezing over them.


Extra Tips: Substitute a gluten Free bread crumb if one is on gluten free diet. I know I've seen some gluten free bread crumb products at Whole Foods.

Credits: this recipe is from "Spanish a collection of over 100 essential recipes" ISBN: 978-1-4075-4949-1. Copyright Parragon Books. (I just love this little book.)

Buen Provecho,
Elsa

Saturday, June 30, 2012

Chorizo and Arugula Pizza in a Cast Iron Skillet

Chorizo and Arugula Pizza

Chorizo and Arugula Pizza in a Cast Iron Skillet

In my home, Friday night is pizza night! We enjoy time together as a family, unwind from the week's hectic schedule, and enjoy simple finger foods. The kids love pizza, and I love making something quick. When you discover how quick this is, you'll say goodbye to frozen pizzas. Once you have all your pizza ingredients ready to go, you'll be able to have a pizza in the hands of your natives in 10 to 15 minutes....no joke! There is one requirement for your impending creation; a cast iron skillet.

POINTERS ON DOUGH:
To make the preparation of the pizza go even faster, buy your dough at your local supermarket or Trader Joe's or use your connections with your beloved pizzaria...they might be willing to part with their dough. If you are using store bought dough, follow the instructions for when to remove the dough from the fridge. I usually take it out 20 to 30 minutes prior, so that the dough has time to relax. This makes the dough much easier to work with. Or, if you have a bread machine, kick off your dough during the day. I have fallen in love with my Black & Decker All-In-One Deluxe Automatic Breadmaker all over again. I place all the ingredients into the baking pan and, voila', I have dough. You can also make your dough according to any recipe you want to try or cherish. Regardless, have dough that is ready to be worked.

To have pizza done in a snap, preparation is key. This recipe is for Chorizo and Arugula pizza, however, feel free to use any toppings that tease your taste buds with delight. This is a pizza for you to enjoy, so feel free to make it your own. I'm sharing a technique that delivers results.

Ingredients
  • Pizza dough
  • Sweet Onions, sliced. (such as Vidalia onion)
  • Pizza Sauce (I really like Lucini's Pizza Sauce which I pick up at Whole Foods, but your favorite sauce will be just fine)
  • Tomatoes, sliced
  • Chorizo (I used a spicier one purchased at Whole Foods from the butcher. Simply remove the chorizo from its casing and saute in a skillet til cooked through.)
  • Mozzarella Cheese, grated
  • Baby Arugula

Method
1. Preheat oven to 500F. (Make sure the oven is very clean, or it will smoke at this high temperature.)

2. Roll out the dough to about the size of the skillet. Brush Olive Oil onto the skillet. Place rolled out dough onto the skillet. Use your hand to shape the dough onto the skillet.


Next, I like to flavor my crust by brushing it with olive oil and sprinkling with a little garlic salt. Feel free to use butter or your favorite spices.

3. Heat the skillet to med-high heat. Use a spatula to lift the dough and check the bottom. It should be heated to a golden color which takes about 3 minutes or so. Dough bubbles may appear as it cooks on the skillet and that is fine. Watch it so it doesn't burn.


 4. Layer a light amount of tomato sauce onto the pizza dough.


Then, layer the cheese and previously cooked chorizo (or toppings of your choice with the exception of Arugula or herbs. I always place those last, after baking.)

5. After toppings are placed onto pizza, brush a little more olive oil onto the crust. Then, place the entire skillet into the center rack of oven.


Bake the skillet for about 7 minutes. Check the pizza for  melted cheese and and for the crust to be golden and crisp. If making a cheese Pizza, heat til edges are golden brown. I suggest checking the pizza about a minute before until familiar with the results from your oven.

6. Once the cheese is melted, remove the skillet from the oven. BE CAREFUL, SKILLET HANDLE IS HOT (make sure to grab the skillet handle with a pot holder)!!! Next layer more delicate veggies; in this case, tomatoes and onions (sometimes, if I want a spicier pizza, I layer on Jalapeño and sprinkle on a little "Tony Chachere's Original Creole Seasoning). Place the skillet back into the oven and heat til edges get golden brown. This may take another 5 minutes or so.

7. After removing the pizza from the oven (again, handle is HOT, SO USE A POT HOLDER), I immediately place the Arugula by lightly tucking it onto the pizza. This is a good time to place any delicate herbs such as basil. It's just how I like to do it so they don't burn. I find the heat of the pizza works well with the Arugula to the point I'm happy and the presentation is better.


Have fun customizing your pizza to anyway you like. Since oven temps may vary, watch your pizza the first time to get the feel of your oven. Then, enjoy your pizza!

Buen Provecho,
Elsa


Monday, March 26, 2012

Mango Salsa

Mango Salsa
Mango Salsa

I love mangoes! I love them anyway I can get them. I think every Cuban has a passion for this fruit embedded in their DNA. Years ago, I discovered how well it complimented fish. This salsa is simple to make and is packed with flavor. It's beautiful colors set off any dish and make it that much more appetizing. My favorite way to use this salsa is paired with salmon. As the warmer weather approaches, we love to grill Salmon outside. There is just something beautiful about grilling the salmon, hanging by our pool, and sipping fabulous mojitos my husband always spoils me with. I love this salsa so much, that I plan the salmon around it, rather than the other way around. If I don't have the mango salsa available, I'll wait to do the salmon. If there is any leftover, I use them to top off fish or pork tacos.

Tips: This salsa is not complicated. Give yourself some time to chop up the few ingredients. Also, the flavors meld much better if prepared the day prior to serving. The flavors really just come together making it that much better. Remove the salsa from the fridge about 30 minutes prior to serving. This will allow the extra virgin olive oil to relax. Lastly, if you have never chopped fresh jalapeños, wear food gloves. Or, be very careful removing its membrane and seeds. The heat is in the membrane and seeds. So simply use the knife to slice off the membrane and scrape seeds away. Dispose off in trash or food recycling container; the garbage disposal may irritate you as the fumes disperse.

So let's get started.

Ingredients
  • 1 1/2 cups pealed, chopped ripe mangoes (a great substitute are ripe, sweet peaches)
  • 1 medium to large red bell pepper, seeded and chopped fine
  • 1/4 cup green onions, sliced thin
  • 1 jalapeño pepper, seeded and chopped fine (remove membrane and seeds if you don't want the heat)
  • 3 tbsp Extra Virgin Olive Oil (I like using a garlic infused EVO, but it is not necessary.)
  • 1/2 tsp lime zest...or more to taste
  • 1 tbsp lime juice, freshly squeezed
  • 1 tbsp vinegar
  • 1/4 tsp salt
  • 1/4 tsp pepper


Method
Fold all the ingredients together in a non reactive bowl. I usually taste the salsa and then adjust the seasonings as needed.

Plating suggestions: Place a generous portion of salsa on top of the fish being served and have extra available at the table. Your guests will surely want a little more.

Buen Provecho!
Elsa


Sunday, March 11, 2012

Rich Raspberry Meringue with White Chocolate Swirls

Raspberry Meringues With White Chocolate Swirls

This dessert is rich! This recipe will produce 8 large meringue puffs. I have never tried to half the recipe, but I will next time. My husband and I could have shared one puff. If you're having a party, though, one could easily miniaturize the size of the meringue puffs.

I don't appreciate the texture of the meriningue as much the next day. But, in a pinch (as dinner parties do usually feel), the puffs could be made the day before and stored into airtight containers. Simply use parchment paper in between the layers of meringues. Then, about 1/2 hour before serving, top with freshly whipped cream, chopped pistachios, and sprinkle a few fresh raspberries. However, when I plan to serve these, I like to start off by creating this dessert first. Then, while it is baking, I continue creating other dinner items.

I like this dessert because it's just something a little different than the desserts one chooses to serve. It truly creates a spectacular dessert that will impress your dinner guests!

Ingredients

  • 5 egg whites
  • pinch of salt 1 ½ cups superfine sugar (not the same as confectioners sugar)
  • 2 tsp corn starch
  • 1 tsp vinegar
  • 3 oz. White chocolate chip
  • 1 ¼ cups raspberries
  • 1 cup heavy cream, whipped to soft peaks (a topping for the baked meringue)
  • 2 tbsp chopped pistachios (a topping for the baked meringue)

Method

1. Preheat oven to 350F. Place parchment paper onto a baking sheet. Place egg whites into clean bowl with salt. Use the whisk attachment (or hand held beaters) to whisk the eggs until stiff. Slowly whisk in the sugar 1 Tbsp at a time. At this point, the eggs should be glossy and very stiff. Add the corn starch and vinegar and mix again. 

whisked meringue (look for stiff peaks)

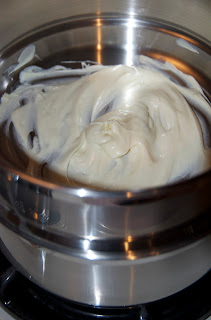
2. Melt chocolate by place them into a double boiler. If you don't have a double boiler, nestle a glass bowl onto a saucepan of simmering water. Use a pot holder to hold the glass bowl while stirring the chocolate until it melts.

melting chocolate
3. Spoon the meringue mixture onto the parchment paper on baking sheet to make a large meringue puff. Take 4 raspberries and a heaped teaspoon of the melted white chocolate and swirl them into the puff. I used a baby spoon to integrate the raspberries and melted chocolate. Take care to not flatten the puff. Try to incorporate as much of the white chocolate into the meringue. If it is exposed, it may brown during baking.

Meringue puff with raspberries and melted, white chocolate sitting on top.

After integrating the white chocolate and rapberries
4. Place the baking sheet of meringues into the oven for 5 minutes at 350F. After 5 minutes, reduce the heat to 275F and bake for 45 minutes. Remove baking sheet from oven and leave to cool. Once cooled, transfer to a wire rack. Top with spoonfuls of whipped cream, a few of the reserved berries, and some pistachios.
After baking, cool, transfer to serving dish and place toppings. Now enjoy!
Credits: This recipe comes from one of my favorite cookbooks, "Small Bites" by Jennifer Joyce. In her book, Jennifer recommends other variations for this dessert; such as, dark chocolate with flaked almonds, dried coconut with mango and blueberries, or banana with caramel sauce and whipped cream.  

If you try this dessert, let me know how it went for you. And if you create your own variation, I would love to hear about it!

Buen Provecho,
Elsa

Wednesday, February 22, 2012

Peruvian Roast Chicken with Garlic & Lime
Ingredients

  • ¼ cup fresh mint leaves
  • 6 garlic cloves, chopped coarse
  • 3 tablespoons extra-virgin olive oil
  • 1 tablespoon salt
  • 1 tablespoon pepper
  • 1 tablespoon ground cumin
  • 1 tablespoon sugar
  • 2 teaspoon smoked paprika
  • 2 teaspoon dried oregano
  • 2 teaspoon finely grated lime zest plus ¼ cup lime juice (2 limes)
  • 1 teaspoon minced habanero chile
  • 1 (31/2 to 4 pound) whole chicken, giblets discarded


Method
  1. Process all ingredients except chicken in blender until smooth paste forms, 10 to 20 seconds. Use your fingers to gently loosen skin covering breast and thighs; place half of paste under skin, directly on meat of breast and thighs. Gently press on skin to distribute paste over meat. Spread entire exterior surface of chicken with remaining paste. Tuck wings behind back. Place chicken in 1 gallon zipper-lock bag and refrigerate at least 6 hours or up to 24 hours.
  2. Adjust oven rack to lowest position and heat oven to 325 degrees. Place vertical roaster on rimmed baking sheet. Slide chicken onto vertical roaster so drumsticks reach down to bottom of roaster, chicken stands upright, and breast is perpendicular to bottom of pan. Roast chicken until skin just begins to turn golden and breast registers 140 degrees, 45 to 55 minutes. Carefully remove chicken and pan from oven and increase oven temperature to 500 degrees. (The "NOTES" section below explains how to cook chicken without a roaster.)
  3. Once oven has come to temperature, place 1 cup water in bottom of baking sheet and continue to roast until entire chicken skin is browned and crisp, breast registers 160 degrees and thighs register 175 degrees, about 20 minutes, rotating baking sheet halfway through roasting. Check chicken halfway through roasting; if top is becoming too dark, place 7-inch square piece of aluminum foil over neck and wingtips of chicken and continue to roast. (If pan begins to smoke and sizzle, add additional water to pan.)
  4. Carefully remove chicken from oven and let rest, still on vertical roaster, for 20 minutes. Using 2 large wads of paper towels, carefully lift chicken off vertical roaster and onto carving board. Carve chicken and serve passing Spicy Mayonnaise separately.


    1. Notes: I only had two hours to give for the marinating process, and the chicken still tasted flavorful. The chicken selected for roasting weighed slightly more than this recipe calls for at 5.25pounds. Also, I did not use the oven. I used a gas Weber grill (goodness knows how I love my grill...but that is a discussion for another blog:) ) I heated the grill to a little above temperature (since heat is dissipated once opened). I set the temperatures to maintain right about 350degrees F. I don't have a rotisserie, so as the cookbook recommended, I placed the chicken onto a 12 oz. beer can. (Basically Beer Chicken: where one empties half the can of beer out of can, and then slide the chicken onto the can. The drumsticks will be pointing down). A smaller aluminum buffet tray was used to cook the chicken; too large of pan can cause much of the drippings to evaporate. Cook the chicken to indicated temperatures as listed in the “method of preparation” section, using a digital thermometer to test chicken.

      In all, I had wonderful results! It was flavorful with a very crispy skin and juicy meat. I wish I could post a picture of the completed dish and there was a scratch and sniff on your monitor! That is my very own picture (at the top of this post). It tastes as good as it looks! 


      Buen Provecho,
      Elsa

      Credits: Cook's Illustrated Cookbook Page 341


Monday, February 20, 2012

Romancing Our Loved Ones


Valentine's Day Picnic

Valentine's Day... and I wanted to create something special for the loved ones in my life. I had hoped to surprise my husband with an afternoon, outdoor picnic with panoramic views of the Golden Gate Bridge. But my busy work schedule made me unavailable. By evening temperatures were too brisk. As a result, I got my creative cap on thought to myself, how can I keep the spice in our romance? I got very excited when I thought, I can move the picnic indoors!

Romancing our loved ones doesn't have to be all that complicated, nor does it need to break the bank.  Ambiance can be created by the use of props you probably already have at home. Plus, the picnic spread can be a combination of one or two simple recipes plus beautifully plated, store bought additions that beckon the appetite through the eyes. For my picnic, I used a woven mat to act as our blanket. It set the scene for our romantic picnic. Next a plethora  of throw pillows, in all shapes and sizes, were placed along the back perimeter of my "blanket." Then, ambience was given to the room by the glow of candles and battery powered votives set all around the space. I also lit a log in the fireplace for an extra glow and warmth. Now the room had a warm, inviting glow. Lastly, I appealed to our sense of hearing with serenades of spanish guitar; complements of Pandora. 

As for the menu, I wanted to keep it a light affair. I chose to make a delectable raspberry meringue dessert with swirls of white chocolate and a red curry pumpkin soup. Each of these recipes will be featured in upcoming blogs. The rest of the picnic required little effort; purchasing ready to be plated cheeses, deli cuts and fruit. Attention was placed in how the items were plated to make them most appealing.

Platters of fruit, deli cuts, and cheeses with sourdough bread

If you don't have time to even whip up two recipes, check out your local deli for additional tantalizing bites and dessert. 

My seven year old got a real thrill with the indoor picnic. The novelty of the indoor picnic made him very enthusiastic to nibble on all the treats, and I'm sure it's a memory he will carry forever. My son and husband felt loved and nurtured by the special feast that laid before them. And we all really enjoyed the cozy warm fire, candlelight, and each-others company. For myself, it is a blessing to just share a special moment together.

I love to prepare great tasting food for others, and I also know in our full and rushed days, it's not always possible to make our meals from scratch. However, we nourish our souls by how we interact with our food and to me, this includes the setting in which it is served and the loved ones we invite into our circle to share it with. 

Take some time to set a date on your calendar for an indoor picnic with a loved one in your life, and let me know how it went! Keep the romance alive!

Buen Provecho,
Elsa

Monday, February 13, 2012

Sopa de Pollo (Chicken Soup)

This morning, my 17 year old daughter woke up sick. No matter how old my children are, they love mom's homemade chicken soup to restore their spirits. This soup is made with wholesome goodness and the flavors one doesn't get out of a can...plus, a lot of love from mom. Let this soup inspire your senses on a brisk day.

This recipe calls for a whole chicken to poach. However, only a breast and leg with thigh are shredded for the soup. Feel free to shred more for your soup or reserve the remainder for another use. I like to get as many meals as I can with one effort, so the remainder of the chicken is reserved for chicken enchiladas.


Sopa de Pollo (Chicken Soup)
Sopa de Pollo / Chicken Soup
Ingredients
  • 3 Qts of waters
  • 2 medium sweet onions, cleaned and cut into chunks
  • 1 bell pepper, cleaned and cut into chunks
  • 7 cloves of garlic, peeled
  • 4 1/2 Tbsp Chicken Organic Better Than Bouillon (or check your bouillon's directions to make 3 Qts.)
  • 4 Tbsp Spanish or Extra Virgin Olive Oil
  • 1 lemon, juice of
  • 1 lime, juice of
  • 1/2 cup tomato sauce (Roasted Garlic flavor, if available)
  • 3 carrots, medium with green leafy tops, if possible. Cleaned and chopped into thin slices. Reserve about 1/3 cup loosely packed leafy green tops, chopped.
  • 1 Bay Leaf
  • 1/4 tsp Bijol (optional) http://bijol.com/history.php
  • 1 whole chicken, (remove neck and giblets from cavity, wash, and pat dry with paper towels
  • salt & pepper, to taste
  • 1 Fideo package (or thin pasta strands)

Method

1.   Take a large pot and fill with 3 Qts of water. 
2.   Place onions, red bell peppers, and garlic into blender. Add a small amount of water to bottom of blender and puree. (You may need to work in batches if your blender is not very powerful.) Add the puree into the pot.
3.   Add Organic Better Than Bouillon into pot.
4.   Add Olive Oil 
5.   Add juice of one lemon.
6.   Add juice of one lime
7.   Add tomato sauce
8.   Add cut carrots
9.   Add bay leaf
10. Add Bijol (optional)
11. Add chicken
12. Add reserved green leafy tops of carrots, chopped, but save a little for garnish
13. Add pepper, about 1/4 tsp or to taste

At this point, it should appear somewhat like
Chicken soup while cooking

14. Bring soup to a boil then reduce heat to medium or simmering temperature. Cover and let cook for about 30 minutes to 45 minutes. Lift the cover and stir occasionally. The chicken meat, when pulled from bone, should not be pink.

15. Once chicken is cooked through, reduce heat to low. Remove chicken onto platter and allow it to cool enough for handling, but not completely cold. The chicken will shred more easily while warm. Remove one chicken breast and 1 leg with thigh. Remove the skin from the chicken and discard. Take two forks and pull the chicken meat off the bone and shred. Or, you can use your hands to shred. (Reserve the remainder chicken meat for another use, such as enchiladas.)
Shredding Chicken
16. Return only the shredded chicken meat to the pot
17. Take about 1/4 of the Fideo package (my package was about 6 oz. and I only used about 1/4 of package) and break the coiled strands into smaller pieces. Add to the soup.
Fideo     
18. Raise heat to medium and cook Fideo until al dente, another 10 to 15 minutes.
19. Remove Bay Leaf and salt soup to taste. I add about 2 tsp.
19. If not serving immediately, and you wish to remove excess fat, place pot into fridge and allow it to cool. Once cool, skim extra fat from top of soup. Reheat soup and serve. Garnish soup with a few pieces of the green leafy tops from carrots.

Serving suggestions: This can be served with Cuban bread or warm corn tortillas & lime wedge. It can be made in advance and/or  frozened for future use.

¡Buen Provecho!